Posts

Showing posts with the label copic markers

Perfectly Poised Pineapple

Image
Hello and welcome back! Thanks for popping in again. It's been a while since I have been able to post, so I thought I would share this little project with you. The other day, after creating a mess in my studio by spreading out all the paper I own, I paired up a design that was cased from a Close to Your Heart design.  I shared this little project on my Instagram the other day and they turned out so cute I decided to make a blog post about them. A few weeks ago I attended at craft sale organized North of where I live in Seattle and met some great ladies. One of them was a Close to my Heart vendor from whom I purchased a couple of scrap layouts from for my Hawaii trip from 2015 (yup - still working on it - little by little!)  She was kind enough to slip an idea book into my bag when I wasn't looking.  (If you don't have the Seasonal Expressions May - August 2016 catalog you can download it here .) Flip to page 27! I love the Calypso line, it's so bright a...

Flamingo Love

Image
Have I mentioned that I love birds? Flamingo's are included! I found this rubber stamp of a cute little flamingo and thought I'd make some simple designs. I've noticed lately that Flamingos are very in vogue re: design right now. I ended up giving the above greeting card to one of my co-workers who happens to love them too. And then I found this flamingo rubber stamp at Michael's the other day which really sparked some creativity.l Its from Stampendous and I freaked out when I saw it because I knew it would make an awesome greeting card. I created a Concertina dry embossed greeting card cut on an angle (also known as a z fold card) and used some scraps to paper piece and layer the flamingo with. The scrap was a pink argyle print I liked but probably would have never used - or so I thought! (ALWAYS save your scraps!) I created depth and interest by stamping him twice and fussy cutting his wing to layer with pop dots. I thought this looked nice with the fol...

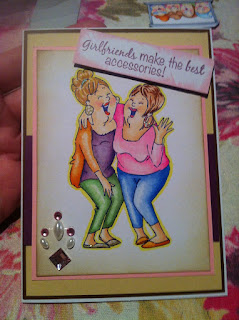
Girlfriends Make the Best Accessories

Image
Thanks for joining me once again! I'm so happy you've come back to join me with on my blog. You've come to the right place to find Seattle's finest handmade cards! Today I've got a real treat for you - a Girlfriends greeting card. This was SUCH a fun card to create. If you have not heard about Art Impressions , then you are missing out!! I love to stamp and color these fun images to create cards that truly reflect the fun relationships in life. I loved coloring this fun image of two happy gals with my Copics! The card didn't need much else as the copics took the stage. I didn't want to overpower the card, so I kept it nice and clean. My boyfriend and I are friends with another couple and we paired this card with a bouquet of fresh cut flowers for a nice hello to our friends the last time we all got together. Its nice to make your friends feel loved and wanted.  Cheers!

Let's Talk Soon!

Image
How often is it that we just get so caught up with life that we sometimes forget to connect with the friends that mean the most to us? I've got a friend that I've known since 3rd grade. We don't talk much anymore, but when we do, its like we pick up right where we left off! So this card seems appropriate for those kinds of friends. I made this card using Art Impression's Texting BFFs set. I hope you like it! Leave a message in the comments!

Gel Medium Background with Brentwood Owl

Image
Today I'm happy to announce that I have been selected to be a part of the fabulous Design Team at JessicaLynnOriginal.com . I'm thrilled and excited to be a part of such a fun and cute stamp design company, and a great design team group of gals!! One of JessicaLynnOriginal s' signature stamp designs is Brentwood Owl . So I created this super cute Seahawks greeting card using him (isn't he adorable!?!) in a 12 shirt. Brentwood Owl  What FUN to color!! I printed him out and used my copics in varying E tones, Y and YR tones and B tones paired with my colorless blender (to create highlights) to make him pop and give him depth. Then I cut Brentwood out and set him aside. Creating a Background To create the colorful background I chose a stencil I really liked, the 6x6 Mini Tiny Circles Stencil from Balzer Designs for TCW. I taped my craft sheet down (I use the Tim Holtz craft sheet, but for this project wax paper or scratch paper would work fine - you just...

Summer Fun - DTC!

Image
Hello and Welcome Back! Today's post is for Designed to Color with the theme "Summer". I created a new style of card (for me) and I'm happy with the results. This image was from Fresh Brewed Designs. I had a lot of fun creating this card. Its out of my comfort zone and something totally new for me! :) Medium: Copic Markers Skin: E000; E00; and E11 Hair: E37; E33; and E30 Clothing: Y06; Y02; and Y23 Other: Spellbinders Nestabilities Classic Ovals Image: Fresh Brewed Designs Paper: Copy paper; and discontinued printed paper. Elements: Just a Note to Say Hello stamp by American Crafts

More on the Copic Color and Ink Workshop 2013

Image
Hello! Back in  December 2012  I first told you about the newest Copic Workshop, the 2013 Color and Ink Workshop Series. I plan on taking this two-day workshop myself if I can manage to swing it. They'll cover: Coloring Various Skin Tones and Hair Styles Oodles of Doodles and Backgrounds Airbrushing Made Easy So Many Surfaces Personally, I'm in love with airbrushing, so I'm looking forward to not only meeting  Colleen Schann, (and learning once again from the fab  Sherrie Siemens!) but I can't wait to learn more techniques to help me get more use out of the markers that I've purchased with Backgrounds and Airbrushing.   Sandy Allnock, President and founder of Operation Write Home, took the workshop and has a great review here . Her photos sure have inspired me! The cost of the workshop is $300.00 for a two-day course which covers four different classes. Can't wait to see the dates and locations when they're f...

Pink, Zebra and Polka Dots Love

Image
I love the combination of pink and black. I just think there's something about it that's super sexy, girly and fun, don't you? I changed up Deconstructed Sketch's Sketch (original sketch shown below) and made it my own. I love what I created, but if I had to add to this card, I think I would have added some stamping on the lower white part in a watermarking ink to add a little more interest. Do you think that would have been too much? I'm excited because I was able to use the beautiful cream flower cabachon I've been hoarding forever. I love this card, I think it's romantic and naughty and nice all rolled into one. Super girly and sexy!  This card is entered for: In the Pink - Pink Valentines/Romance challenge CMC Copic Challenge Group -  **GIRLY TIME ** Just Some Lines - Love Challenge Little Claire's - Love and Romance Challenge Penny Black Saturday Challenge - Love and Marriage Twisted Tuesday Challenges - Use a Butto...

Martini Tag with Custom Hand-Dyed Ribbon

Image
Welcome Back! Today's post is a handmade tag created using Kenny K's Happy Hour image, a vintage polka dot background stamp and some custom hand-dyed crinkle ribbon. I used my copics to color the image and slightly around the outside of the image.   I layered and blended the color.   I then used my copics to dye the crinkle ribbon, crumpled it, sprayed it with blender solution to create a waterbled look and hit it with the heat gun, crinkling it as I heated it.  I then used my Tim Holtz Distress stains to cover my tag with red, hit it with the heat gun and stamped in white with my vintage polka dots rubber stamp.   After, I cut out my martini girl and glued her down.   Simple and fun, a great little accent to a page, card or gift!   Cheers! This project was entered in: Think Pink @ Ladybug Crafts http://ladybugscraftsinkchallengeblog.blogspot.ca/2013/02/think-pink-lci.html

New Copic Workshop!!!

GASP!! Have you heard?! There are new Copic offerings! Not only is there a new three-piece blending kit available, but there is a workshop called  The Copic 2013 Color & Ink Workshop!  Of course I'm absolutely dying to take this workshop!! I've got to first take my Intermediate Certification Class as I am certified for the Standard Certification. Are you going to sign up for the workshop???

Mark's Finest Papers - You've got Style!

Image
I just love this feminine set from Mark's Finest Papers. It is the You've Got Style set and it is SO much fun. I was just having a play and not really concerned with following a sketch, but it turned out pretty cute anyways. I background stamped with the shoes offered in this set and colored them with my copic sketch markers. I stamped the boot and a handbag and popped them off with pop dots and stuck them on. A pretty simple card, but pretty cute! ;) I hope you like it. Cheers!

Spilling the Beans!

Hi Everyone! I've been so looking forward to this day since I found out, but today I actually get to spill the beans! WELL...Ever since my good friend Cheryl Valade z introduced me to Copic Markers I've been addicted to coloring with them. And as a coloring fanatic, I've also been a fan of Kenny K for quite some time. So, I'm so excited to announce that I've made the team for Kenny K! I'm looking forward to getting to know my fellow teammates and enjoying our time together on the team! Yay! :) Cheers,

Graphic Novel Inspired Card with Kenny K

Image
Do you love comics? I'm reading this graphic novel right now called Going to Amerikay and its beautifully done. When I saw this image at Kenny K I couldn't resist. I used the Total Drama image, which I love, obviously, because she's versatile.  I loved coloring all of this image. The hair an the makeup and even the shirt and jewelry were fun too! I added a simple harlequin background to offset the image just a tad. I think it turned out nicely. What do YOU think?

Stamping on Plastic Elements

Image
Hello All, Here's a tutorial for you so that you can incorporate your images into you projects in a new way! You Will Need: A plastic element of some sort (I'm using TH fragments with the tag hanging bit) A permanent black ink (I'm using Memories) Your favorite Bombshell Stamps image (I'm using one of the swallows from  Love & Luck ) Glossy Accents by Ranger Alcohol-based markers (I'm using Copics.) A heat tool Your favorite accent paper Scissors Emery board Thread or cord or a jump ring, if you wish Start out with a clean plastic surface of your element. Stamp your image. Heat dry with your heat tool. (Be wary of melting the plastic!) Whip out your copics! I'm using B34; R08; and YR04 to color my swallow. Have fun coloring! Layer colors if you like for more opacity. I have chosen to add B24 to my bird to add more depth. I found that with Copics on these fragment bits, particularly with the lighter colors, ...

Poker Face Greeting Card and Matching Envelope

Image
Poker Face Greeting Card & Matching Envelope Supplies KaiserCraft Timeless Collection p653 Sheet Music paper trimmer scissors nail file a2 card base with matching envelope black and tan gingham paper (I'm using DCWV 12x12) Complementary  red paper (I'm using a sheet from Martha Stewart's Critter's Designer Paper Pad) Retro Cowgirl Rubber Stamp Set by Bombshell Stamps (using the profile pinup) Luck and Fate Rubber Stamp Set by Bombshell Stamps (using Luck & Fate banner) glue dots copics or colored pencils adhesive runner xact-o knife and self-healing cutting mat (or other protective surface!) pop dots or dimensionals Instructions Make your card base. (I cheat and buy mine!) flip times collection p653 over and cut out your choice of playing cards. If you want you can look up poker hands and arrange the cards that way its kind of a cute touch. Trim playing cards and shape with a nail file if needed. I am using...