Tutorial: Crackle Paint "Check Out the Booty" Magnet Tin
Tools
Tin with clear top (I am using the Grundtal Container from Ikea.)
paper
acrylic paint of your choice in color
crackle medium (I'm using Deco Art 1 Step Crackle Medium)
applicator or brush to spread the paints
distress color in either a matching or contrasting color to your acrylic paint
scissors
rubber stamps (I'm using the Bombshell Stamps Vintage Mermaid Rubber Stamp set Mermaid Treasure)
pen
permanent ink
*Note - my tin has a magnet on the back so I can stick it to the fridge. If you want to use a scrap tin that you have, such as an Altoids tin and you would like to add a magnet sheet to the back, magnet sheets can be purchased at your local hardware store. Usually they are adhesive backed or you can hot glue them to the back of the tin. There are also variations on this project such as laying down paint and letting it dry, sanding the peaks of the tin, then laying down a second coat of paint and wiping the second layer of paint away so that the second layer only sticks to the roughed up part of the tin.
Instructions
Lay down a coat of acrylic color onto your paper and let it air dry.

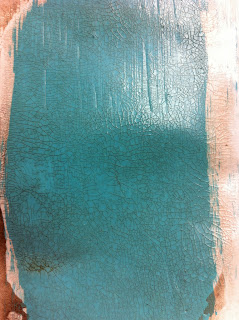
Once the paint has dried, lay down a coat of crackle medium. You want to let this medium go where it would like as the paper warps because the thinner the layer of the crackle medium, the smaller the cracks - the thicker the layer of the medium, the larger the cracks. Let it settle where it wants on the paper.

 I set my paper on the stove under the fan to assist in the drying process. Let dry for 2-4 hours, depending on thickness of the coat you laid down.
Once your paint is dry you should start to see cracks appearing.

Work your distress ink or other ink into the surface. The ink will settle in the cracks.
 Wipe off the excess ink from the top of the paint. The ink in the cracks will remain.
Trace the top of your lid with a pen. Cut out the circle and stamp with permanent ink.


Wedge into the top of the lid, decorative side up. Fill tin with goodies, finish with decorative ribbon or raffia and you are done!

I hope you try this tutorial as I had a lot of fun doing it!
Cheers,
Xo, Rachael
Tin with clear top (I am using the Grundtal Container from Ikea.)
paper
acrylic paint of your choice in color
crackle medium (I'm using Deco Art 1 Step Crackle Medium)
applicator or brush to spread the paints
distress color in either a matching or contrasting color to your acrylic paint
scissors
rubber stamps (I'm using the Bombshell Stamps Vintage Mermaid Rubber Stamp set Mermaid Treasure)
pen
permanent ink
*Note - my tin has a magnet on the back so I can stick it to the fridge. If you want to use a scrap tin that you have, such as an Altoids tin and you would like to add a magnet sheet to the back, magnet sheets can be purchased at your local hardware store. Usually they are adhesive backed or you can hot glue them to the back of the tin. There are also variations on this project such as laying down paint and letting it dry, sanding the peaks of the tin, then laying down a second coat of paint and wiping the second layer of paint away so that the second layer only sticks to the roughed up part of the tin.
Instructions
Lay down a coat of acrylic color onto your paper and let it air dry.

Once the paint has dried, lay down a coat of crackle medium. You want to let this medium go where it would like as the paper warps because the thinner the layer of the crackle medium, the smaller the cracks - the thicker the layer of the medium, the larger the cracks. Let it settle where it wants on the paper.


Once your paint is dry you should start to see cracks appearing.

Work your distress ink or other ink into the surface. The ink will settle in the cracks.

Trace the top of your lid with a pen. Cut out the circle and stamp with permanent ink.


I hope you try this tutorial as I had a lot of fun doing it!
Cheers,
Xo, Rachael


I LOVE! please say youre going to post this on the blog!!!
ReplyDeleteHi Emily! Yes, it's going to be posted on May 18th. :)
Delete